Thursday, December 1, 2011

Touch up, Tuning, and Turn on!

Well, I missed doing a November update by about 3 days - evidence that I've been EXTREMELY busy over the last six weeks.  If it wasn't with finishing this house (which as you know I've been doing in my "spare" time), it was with several new proposals at work that came out (which are always add-on work to regular day-to-day activities), or the new band I'm in that's taking off like a 747 ( visit http://www.reverbnation.com/flatlineband ), and trying to keep up with just general life otherwise. I try not to neglect the important things (wife, daughter, family, friends, bills, lawn, etc.) but some things have slipped through the cracks in all the juggling (verizon bill!).  Nonetheless - as far as this blog is concerned, I expect to do one more entry after this one of the completely finished product, prior to move-in.

Speaking of entries - one of the latest "Touch ups" has been the final stain on the front door - I think it came out great.  It's a "Therma-Tru Fiberglass EnergyStar rated door (the whole house is "Energy-Star" eligible for certification) with their recommended stain package.  The darkness of the door stain really brings out the gold "caming" in the door glass too. 

Since my last post, we've installed all the final plumbing fixtures, all the final electrical devices (switches and outlets) and fixtures (lights, chandaliers, etc.) and the HVAC units and ductwork in the crawlspace.  That required 3 "Final" inspections, one each for the electrical, plumbing, and Mecanical, which have all passed.  All-in-all, it was about 3 weeks worth of very busy work, with lots of people in the house at the same time.  To me, that was very nerve wracking and required alot of management and oversight, just to make sure everyone was doing what they were supposed to, things weren't getting hung upside down or inside out, and that the cracked toilets actually got sent back and replaced with new ones w/o cracks.  Alot of shopping was involved, buying everything. One trip to Lowes Home center drew a reaction from a manager when he saw my shopping cart stacked full of about 40 doorknobs, latches, and locks - he walked by and said "Now THAT'S what I'm Talkin' About".  They know me on a first name basis now.  There are a ton of little things you don't ever think of - like door bumps (that keep your doors and doorknobs from hitting the walls behind them) - "Yes sir, I'll take 24 of those and about 18 of these "hinge bumps - oh and I'll also need about 235 light bulbs too please".   - You think I'm kidding???


We had some challenges with the Master Bath "ClawFoot" Tub and fixtures.  Had to go all over the country to find all the pieces/parts to get that thing setup right.  Took many return-trips by the plumber and lots of cussing.  You'd think they'd be easy.  Here are some bad pictures of the Master Bath starting to come together.  Also had to tear out not one, but TWO vanity sinks/counter-tops from bathrooms that just didn't work.  A bit of a design problem and probably some communication breakdown at the start of that order, but in the end, Kudos to FIRST-CHOICE Custom Cabinets of Raleigh for being customer-focused and making it right - replacing the tops free of charge after some rather difficult conversations.  Everything doesn't always end up how you think it will, no matter how hard you try.
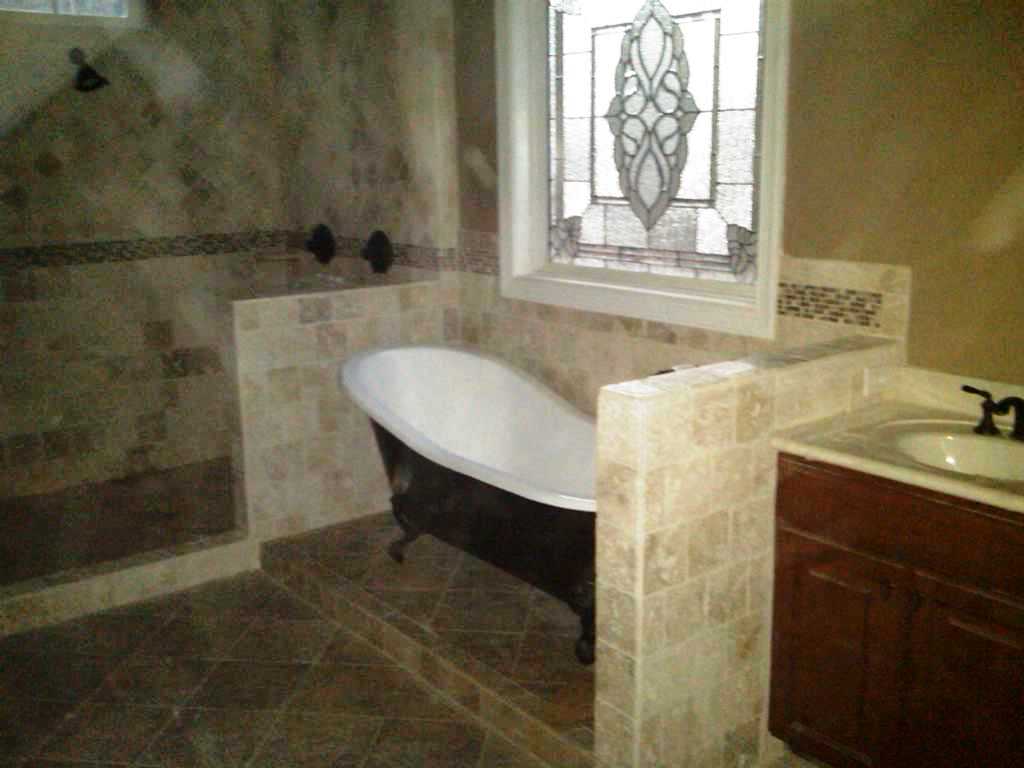
Other than that, things seem to come together pretty well.  The next big step is to get the power turned on in the house.  I learned there were two paths to accomplishing that:  (1) Pay what equates to nothing more than another TAX to have "contingency power" turned on, or just go straight for a final inspection and "Certificate of Occupancy", after which the house is deemed habitable by the city/county inspections and the power can be turned on.  Being the "prudent" financial conservative that I am, we're going straight to C.O. upon advice of my electrician.  Why bother with contingency.  All I'm waiting on for that is the shower enclosure and final soil termite treatment - both of which should happen tomorrow.  So hopefully, we'll have power next week.

That's important to be able to do the two last major things: - finish the Hardwood floors and install carpeting.  Both of those jobs require Heat and/or A/C running to condition the environment to the right temperature and humidity levels for the hardwoods to be final-sanded, stained, and finished, and for the carpet to be properly stretched when installed.  After that - we clean everything up, hang the last few shutters, add a little more sod/grass/landscape on the corner where the dumpster is, pave the bottom of the driveway and - done.

Here's a few closing outside pics taken by my friend Lee - the up-and-coming professional Photographer.  I'll provide some interior shots in the next blog entry, after the power/lighting is on.  Thanks for following along!


Sunday, October 23, 2011

A Real Yankee Fireplace!

If I'm not mistaken, I believe the fireplace was what got me motivated to get out and start building this house in the first place.  I was tired of looking at fake logs behind a fixed piece of glass that I had to flip a switch to start.  My first house in Ohio had a large Brick/masonry fireplace that took up an entire wall of the room - longways, and when that wall got heated up with about 6 good logs burning, it kept the whole place toasty no matter how cold it was outside.  So the very first requirement I had for my next house was that it had to have a REAL fireplace that could handle more than two Duraflame logs at a time.  I think I've succeeded.  As you can see by these first couple of pics, I'm now the proud owner of a good looking stone-hearth fireplace.  Most homes in this part of the country, even alot of custom builds, have "gas logs" instead because they're alot cheaper to "insert" and the winters are fairly mild.  But I've never much cared for them - even though I had them in the last two houses - after having that first "fire-wall".  Now, thanks to a FANTASTIC job on the stonework by Ken Carroll from GIZA Stone, this is the centerpiece of the whole interior of the Roadhouse. 

Other work on the interior has progressed well at the same time over the last few weeks.  While we're on the topic of stone, you can see from this next pic that the granite countertops have gone in with which I'm also quite pleased.  The granite slab used for them was called "Monte Carlo" granite, and all pieces were cut from the same single Italian slab of granite.  I think it blends well with the cabinets and tile backsplash.  Continuing with the stone theme I also went with a stone tile floor in the kitchen, with mosaic inlays in the breakfast area (can't see that in the pic).

On the outside, Blake and the guys at Panoramic Landscapes finished up the grounds with a fresh crop of Fescue sod.  INSTANT LAWN!  It really helps make the place start to approach a finished look and they also did a great job.  Notice, I don't give plugs for ALL my subcontractors - just the one's that really do a bang up job for me. We even had enough left over to do part of the backyard too, which really helps with drainage and runoff around the house.  The trick now, is to keep it sufficiently watered over the next several weeks to assure the sod takes root into the ground beneath it.  This is a great time of year to be nursing fresh sod in, but it still takes a bit of care and attention to make it work.


I have painters scheduled to show up this week and coat the place with a couple dozen gallons of Sherwin Williams' finest - well, mid-grade at least.  In writing the paint contract, Ed (Home)- wizely advised me to be sure to specify the grade of paint and MINUMUM 50 year caulking be used throughout the entire house to be sure it holds up for years to come. 

Next up, I have a bunch of fixtures on the way - lights, plumbing, etc. - which should be included in the next blog in a couple weeks.  After that, just minor details - gutters, shutters, screens, knobs, locks etc. to finish up.  Stay tuned - it won't be long now!

Sunday, October 16, 2011

Fast and Furious October

Even though it's cooling off outside, once we got past the rain things really started heating up inside.  I've got a ton of activity going on finishing up this month and it's hard to keep up...both with the work AND the cash flow rolling out.  There are more trades/contractors in play now than ever before at the same time, requiring lots of coordination, and not to mention lots of cash.  I feel like I'm running my own personal economic stimulus package here, keeping half the county employed.  If you check the time of this post, I'm obviously not sleeping well at this point (also due to other stresses besides this project) and am looking forward to finishing it all up in the next 5 or 6 weeks.

As you can see from this recent photo, the outside is really starting to shape up, thanks to grading and some initial landscaping work.  We should have sod laid down in the front yard this week which will further serve to enhance the appearance.  Still need to put shutters up on the front windows, finish painting the exterior trim around the Bay window, stain the front door/sidelights, and install gutters and downspouts.  That will finish off the front exterior.   In the back, the two porch ceilings need to be stained and a finish coat of trim paint applied to most surfaces there, along with the screens for the screened-in porch.  I really like the look of the "Chippendale" railings on the deck, and plan to eventually paint them white, but not for a good 6-8 more months so the pressure-treated posts could dry out a bit.  I'm afraid we may have missed the window of opportunity for ideal timing on the grass seed in the back, but we'll see.

As for the rest of the activity, as I mentioned above it is extremely busy.  I've got most of the ceramic tile work completed but am waiting on the Granite countertops to be installed to finish up the ceramic backsplashes in the kitchen.  Still have a few outstanding issues with finishing up the kitchen cabinets and vanities in the bathrooms - lots of details to be concerned with there.  The trim carpenter has taken almost twice as long to complete his/their work than originally anticipated, and is being held up slightly by problems with materials/supplies being delivered that are damaged, warped, wrong, or otherwise problematic.  Although Builders-First-Source started out doing quite well supplying the job, they've really slipped down into marginally acceptable performance here near the end, causing numerous problems and delays to progress.  I've got the landscapers going hot-and-heavy on the exterior and a new stone mason coming in this week to finish the fireplace trim inside.  That will be a large piece of work to get behind me.  After that, it's on to painting the interior and the final plumbing (installing toilets, fixtures, and water heater(s)), electrical (light fixtures, switches, and appliances), and HVAC work.  I still have to purchase a ton of fixtures and hardware for the finishing, but shouldn't have a problem getting it there in time for them to do those installs.  Last will be sanding/staining the hardwoods, sealing the floor tile and grout, and then carpeting.   


I'm still not sure what to do with all the underbrush on the hill in front of the house, but at least it's been cut down now and you can actually see the house from the road.  By the next time I get around to posting, I should be pretty close to completion and have power hooked up inside the house to get some interior shots. 

Friday, September 30, 2011

It FINALLY stopped raining!

 
Yes, but not before "reining" some serious havoc on my schedule and subcontractor management.  Since I last posted to the blog (over 2 weeks ago), it has rained almost every day.  I was originally scheduled to have the concrete poured for the upper driveway and sidewalks over two weeks ago, but the rain just kept coming.  This of course all started the day AFTER my concrete crew formed and back-filled the entire area with 6" of fresh North Carolina Gold Dirt/Clay.  This was all carefully maneuvered in front of each entrance to the house where the sidewalks and parking pad will be.  Then the rain started and that all turned to knee-deep mud and muck.  Having your house surrounded by a moat of thick mud/muck makes access nearly impossible without tracking tons into the garage and subsequently the interior of the house that is now approaching finishing details.  So, needless to say, I've been rather freaking out over the whole scenario over the entire period.

In addition to creating a gawd-awful mess, this also got things kinda backed up on work too.  The most heavily impacted was the landscaping.  Timing on the landscaping is critical because there's only about a 3 week window in September when you can put down new grass seed and have it take on a new lawn in this part of North Carolina.  Any sooner, it's generally too hot and dry and the seed will just die before it ever germinates, any later and the new seedling grass doesn't have enough time to firmly establish before a hard freeze and Winter hibernation, and it will die the next spring/summer due to being too fragile.  So this was a large impact.  We'll be ok with the front grass because it'll be sod (pre-grown "carpets" of grass), but the back/sides will be a bit of a gamble now with seeding.   It also impacted the other trades working full time in the house - Finish Carpentry, Floor Tile, and Cabinet install - not only from their personal access to the inside being challenged by the mud, but also because there were large material deliveries associated with this work that also needed to be able to back trucks up, unload and move materials in.  So, as you can see by these pictures, it was just a huge mess.

There's been a lot going on nonetheless.  This is not an uncommon occurrence in a construction project, and everybody kind of takes it in stride - except the GC/Builder (me).  I of course spent sleepless nights terrorized with thoughts of the whole house being ruined and all of the 'rhythm' of the construction process being thrown out of wack with deliveries coming and nobody there to receive, and tradesmen stepping on each others toes and everybody getting pissed.  The last thing you want is anybody in the house working pissed off.  In the end, it all worked out ok.  We have a sunny dry week ahead forecast, and the Concrete will go in on Monday morning.  The trim carpentry is moving along well, cabinet installs will be completed today, Tile flooring and bathrooms will be done by mid next week, and I'll be moving on to painting.  The next pictures that go up in the next blog entry should really start to look close to a finished product and might even have a flower or two and a pumpkin on the front porch!

Monday, September 12, 2011

Making the Turn to the Homestretch

It's hard to believe we're heading into mid-September already but we've certainly come a long way since March!  The past month's work has been filled with finishing up the exterior trim work and lots of planning and design on the interior.  The photo above shows the current look from the front with the stone and stairs done.  The bay window is now also trimmed out, although that was done after this photo was taken.  I've been spending a lot of time getting quotes and working with various new contractors on the next phases of finishing.  Even though we were 3 months away from completion, I had to lock in a landscaper for that work because the good ones book up way in advance.  Plus, if you want to plant grass or Sod in North Carolina - late September is the prime time to do that because you still get a good 2 months of warmth and sunshine but without the searing heat that fries fragile new turf.  I'll be putting down Sod (Grass rolled up on palets delivered by truck) in the front, and seeding the back.  I spent a number of contemplative minutes just standing across the street to decide how to do the front yard.  Right now, the view from there looks like the picture above, but when the landscaping work is done, all the ground brush will be replaced with some planned vegetation, a gentle slope up, with a few of the skinny pine trees gone.  We'll probably keep a big Maple out front and also the Elm that is hard to see here hiding behind the two skinny pines sticking up at the left-front of the house.  I also like to keep the large towering pines surrounding the house as much as possible.  They make good lightning rods, which is a very big deal here (NC is #2 in the country for Lightning strike deaths and houses getting torched from hits).   

The back of the house has been getting attention this month also from my supervisor Ed Anderson and his fine gentlemen from "HomeWize" ( http://HomeWize.biz ).  I am not ashamed to put a plug in for them here and say they do GREAT work and the deck is coming out beautiful! The covered part of the deck will be screened in - recessed into the house w/the french doors, exiting out onto an open deck that will wrap around the corner of the house to the covered rear entrance on the garage side.  The deck photos above show that work in-progress, with a closeup of the first "Chippendale" railing Ed and his guys completed on the right.  That design will go around the entire deck. You could also see the finished (but not yet stained) natural wood ceiling that will cover the screened-in porch in the closeup photo.  I'm looking forward to pulling out the natural grain of the wood with a basic varnish finish coat on that stain-quality "Tongue & Groove" ceiling.

Well, the picture of the guy on the utility pole out front shows the latest accomplishment, which is getting the main power line run underground to the meter-box on the house.  That signifies that most of the "construction" work is now complete, and the artistry, craftsmanship and finishing of the interior begins.  I'll leave you with the current picture of the entrance foyer from the inside looking out, because that will all change starting tomorrow, when the hardwood flooring contractor shows up and starts putting down the base and hardwoods in the formal areas.  It won't be long now! If you made it this far - thanks for listening!  :)

Sunday, August 14, 2011

Let there be ROCK!

It's been nearly a month since I've provided an update on the house and the natives are getting restless - harassing me for an update on progress, so I better provide a new entry before I get gang-tackled and beaten! Things have slowed down a bit now that we've mostly moved inside after completing the insulation and garage slab.  I titled this post "Let There Be Rock" for two reasons:  (1)After over 3 weeks of promising to start "tomorrow", the masons FINALLY showed up on Saturday (8/13) and started putting up the "Top Rock" stone veneer on the remaining outside walls of the house.
You can get an idea of what it'll look like in the picture at left around the nearest window.  They will be covering all the remaining white "House Wrap" with that stone veneer - technically called "Fieldstone" in a finish that the Dutch Quality Cultured Stone company calls "Top Rock".  Once finished, I think it will be a dramatic front of the house to go with the "tumble" style brickwork and the "shake" siding above.  The process for applying this stone is quite meticulous, in that first they cover the Tyvek wrap with a thin metal screen material, and then that is covered with a wet mortar/glue mixture that kind of resembles a grey stucco.  Then the rock is placed piece by piece into the mortar/stucco stuff and manually arranged tightly on the wall.  Mortar is then used to fill the joints between the stone to give the final finished appearance of natural stone and hold everything tight.  There are pre-cut corner pieces, and trim pieces that serve as the "soldiers" for trim above doors and windows.  This place will be a fort when completed.

The second reason for the title, is for SHEETROCK.  Three Hundred and seventy five sheets - mostly 4.5 x12 ft. each - of sheetrock in this place.  It's not much to look at - sheetrock is pretty boring - but here's one picture of the inside completed with sheetrock to the right.

That ended up being a bit of a budget-buster.  If I had to do it over again, I would try and come up with another way to pay the drywall contractor for doing that work.  They typically get paid a certain rate per sheet - which is what I did.  Although I got a very good rate up front, there's really no way to make them work efficiently because it is very much to their advantage to use MORE sheets = more pay.  It's very difficult to get an accurate estimate of how many sheets should go into the place with all the cutting and fitting that goes on, particularly on this kind of design with a lot of angles and few perfectly whole/square sheets.  But I KNOW these guys were throwing away good sheetrock that could've been used on smaller spaces.  When that happens, I end up paying twice for their inefficiency: First for the cost of the sheetrock itself, and second for their per-sheet rate to install and finish it.  Ed tells me this is a VERY common practice and a problem with every house's construction, and you're kind of at the mercy of the sheetrock contractor's virtue (now THERE's an oxymoron!).  All in all, I think I could've only saved about 3 - 4% of the total ~$10k contract cost including materials if I were there watching and managing every single sheet that went up and into the dumpster.  That's roughly $200-$300 which in the larger scheme isn't a huge amount, but equates to a bonus for the sheetrock contractor.

After all was said and done though, they did a fine job, and we're ready to move on to other finishing work. Sheetrock was a major ordeal that took place over the last three weeks and started with me watching (and eventually helping) ONE GUY deliver, unload, and place all 375 sheets of sheetrock into the house, on 3 different floors, all by himself, over the course of about 4 hours.  I was appalled that the supply company did that and have since canceled the rest of their contract as a result.  I considered that abuse - oh, and it was THE single hottest day of the year that day - 104 while he was doing it.  I will say the gentleman never complained or whimpered a bit and was the utmost professional.  But he never should've been doing that alone.

One suggestion that I HIGHLY recommend if you ever do this yourself.  While waiting for the drywall delivery to arrive, I was quite bored, so I decided to videotape (using my smartphone) every square inch of the interior wallspace in the house while talking and describing what was there BEFORE the drywall went up.  This will give me - and any possible future owner of the house - a PERMANENT video record of exactly what is behind each wall, where every stud, drain pipe, supply line, and nail block is INSIDE the walls.  If you have ever tried to do any renovation or minor addition/construction to an existing house, you're always wondering what's behind the walls.  Well, with indexed video of each room, hallway, and piece of wall/ceiling space, I'll always know what's in there.  If I can add a video to this post later - here's one, as promised:

.

Next up - I've got all my cabinets and countertops ordered, so I better get on the ball with getting plumbing and lighting fixtures on the way, and a good interior painting contractor (the drywall guy wants to do it, but we'll see).  Also I have landscapers showing up next week, and the intermediate grading to be done out back so we cans start framing the deck.  I also have to epoxy the garage floor, finish the bay window, put up ceilings on the porches, and get a garage door installed!  I did a walk thru with one of two trim carpenters that are bidding on the job, and will need to get a take-off of trim materials and interior doors done this week, along with the fireplace stone/hearth finishing estimate.  So much to do....and this is all in my spare time!  :)

Happy trails!  Til next time. 

Tuesday, July 19, 2011

Going "Green" and reducing my footprint

Some talk the talk.  I've decided to walk the walk.  My house is now at the point where the rubber meets the road on either "doing the next right thing" or saving a few bucks.  Having been a consultant to the EPA for the last 10 years if nothing else has at least dramatically increased my awareness of the environment and the long term impact certain things have on it.  The company I work for and the life I now lead put "doing the next right thing" high on my priority list.  In fact, my company even has a major contract with the US DoE supporting it's "Energy Star" program.  All of that has contributed to me deciding to build an "Energy Star" house, minimizing the overall impact my house will have on the environment in the long run.  I've done some research and found that it doesn't take an extraordinary effort to minimize your carbon footprint and do you part in saving the planet - just a few key decisions on materials and systems that I'll cover in this blog entry.

 1)  INSULATION  Most houses have traditionally used some variant of fiberglass insulation in the past.  A growing trend now is in the direction of "Spray Foam" insulation, which is what you see in the next few pictures.  I've just completed having the entire house blown with spray-foam and the process blew me away (pun fully intended!).  There were guys running around in head-to-toe white astronaut suits with full face masks and head gear making an incredible mess out of the place.  
This is one of the major Energy Star requirements and recommendations for several reasons: (a) Pound for Pound, the insulating capacity ("R-value") of the spray foam product far exceeds its fiberglass counterpart, so technically you use less and nothing is wasted (the overspray is removed and recycled into more sprayfoam) (b) when properly applied, the stuff seals up every little nook and cranny of the house that outside (hot or cold) air would otherwise come in thru if traditional insulation were used to create drafts and outside-air flow thru your house, and (c) It is a whole-house solution to insulation that, in the long run, substantially reduces the amount of energy required to heat and cool your house, year after year.
Yes, spray-foam is a more expensive insulation alternative to traditional fiberglass - my guess is about 40% more cost to insulate up front.  This is why most General Contract Builders resist using it - they are not concerned with anything but REDUCING the overall cost of construction and selling for the highest profit as fast as possible.  Few home buyers are savvy or picky enough to not buy a house that doesn't have spray-foam.  BUT in the long run, it not only makes your house "feel" warmer in winter and cooler in summer by eliminating drafts, it eventually puts money BACK into your pocket.  After about a 3 year pay-back period on the additional investment in sprayfoam, I should realize as much as a 40-50% reduction in energy bills to heat/cool for the rest of the time I live there.

THIS is why it is a MAJOR Energy Star component, it translates into a 40-50% reduction in natural resources used to generate the energy used to heat/cool your house.  After seeing it done, I'm telling you, this stuff is amazing and should be in every single house ever built from now on.   For more information and some FAQ's and A's on BioBased Spray foam, follow the following link:
http://www.biobased.net/homeowners/index.php .

2) WATER
If you're like an overwhelming majority of homeowners in the U.S., you probably have a hot water tank in your house somewhere.  What does a hot-water tank do? - - - It STORES hot water for your convenient use when you want a shave, shower, or whatever.  Since it STORES hot water, that means it is CONSTANTLY maintaining a fairly large supply of water.  That means the heating element in your hot water tank (gas or electric) is using energy around the clock (like when nobody's home), every day (even when you're away for 2 weeks at Grandma's house) to keep that water hot for you when you're ready to use it.  My new house will NOT have a hot water tank.  It will use an IID Gas "ON-DEMAND" Tankless water heating system.  This is very different than a tank, highly Energy Star compliant, and very energy efficient because it ONLY heats the water WHEN YOU NEED IT, it does NOT maintain a tankfull of hot water.  It also NEVER RUNS OUT of hot water because it is a continuous solution when in use, heating the water as it passes thru the unit, and it uses NO energy to heat hot water when you aren't using hot water.  That's huge.  Again, since you're using less energy in the long run with this system, it is considered very "Green".  Yes, a little more investment up front than a traditional tank, but a large return after the relatively short 1 year ROI on the additional cost.  http://www.energysavers.gov/your_home/water_heating/index.cfm/mytopic=12820

3)  WINDOWS and DOORS
Since this is turning into a  rather lengthy Blog Post, I'll shorten these final two discussions.  Windows are huge contributors to radiant heat in your house, so Energy Star requires windows that reduce the amount of ultra-violet light that comes in and heats your house through passive radiation.
In southern climates, it's very substantial.  High end UV reduction windows use Argon Gas as a filter between the insulated multi-paneled windows.  The next level down, which is still Energy Star compliant simply uses what's called "Low-E" glass, which is pre-treated in production of the glass to limit ultra-violet radiation.  That's what I have, along whith "Therma-Tru" insulated entrance doors - also Energy Star compliant.

4)  APPLIANCES
The final element in my Energy Star house considered were the appliances.  Ever noticed the "Energy Star" seal on some dishwashers, ovens, and ranges/cooktops?  I've decided to use a rather un-common but HIGHLY rated brand of Dishwasher and in-wall Oven, called "FISHER-PAYKEN".  These are near-commercial grade products, and the real saver here is what they call a "Dish Drawer", in lieu of a dishwasher.  It slides out like a drawer for easy loading/unloading, and is very quiet and uses a longer wash cycle to reduce the energy needed to wash the dishes.  The FP Oven is highly insulated and heats very evenly and is also Energy Star compliant.

The GREEN BONUS:  Even though most of these items are more costly than their less "Green" counterparts, the government provides substantial "Energy Star" rebates, refunds, and tax credits for using them, making the ROI's, payback periods, and additional costs even smaller!  In the long run, these are simply smart choices if you ask me that you won't normally find in most homes because of the Builder Cost equation. So far, I think they're very strategic choices that will put money back in my pocket in energy savings year after year.

Saturday, July 9, 2011

Not all Angels have wings

It's July, we're in North Carolina, and that means it is SUNNY, HOT, and HUMID as hell.  If we're lucky, the heat and humidity crank up with low pressure and unleash some killer downpours with vicious lighting in the late afternoon to cool things down, but not for long.  It usually just adds to the humidity in the long run.  So with that in mind, I thought I'd post some well-deserved recognition photo's of the crews that have been working out in this furnace the last few weeks.  Things have been moving right along well and it's all mostly good news and status quo for this post, which in my book is GREAT.  This first photo is the lead guy of L&S Heating & Cooling's HVAC crew - they call him "Angel".  I doubt that's on his birth certificate, but it's what he answers to so it works for me.  Here he's pumping up the pressure in the A/C lines getting ready for the "Mechanical" inspection, which happened on Friday (7/8).  That inspection "mostly" passed, although there's always something you either don't know, forget, or has recently been changed.  The inspector was happy with the work but couldn't officially "Pass" the Mechanical because we never got a "Fireplace Permit".  Who'da known that this year, Durham County started requiring them (obviously just to generate an extra $57.00 of revenue per fireplace)?  I didn't, nor did my fireplace contractor, so off to City Hall I ran to get one.  Now we're ready for the all-important "Framing Inspection", which should happen next week.  That's a major milestone and kind of marks the mid-point of the job, and when most of the work moves from outside construction to inside finishing.

The two guys on the right are the leaders of "Johnson's Roofing" crew.  You wanna talk about some serious work? - try putting 60-square (that's about 180 bundles!) of shingles on a 12-12 slope roof (that's a 45 degree angle) all day long when it's sunny, and 97 degrees out!  That's what they do  pretty much every day, unless it rains alot - and I added "alot" because they'll work in a little rain, and it probably feels good at that point.  I think the end-result of the roof looks GREAT - as shown in the photo below.  And it was put to the test the day after they finished with a downpour of 2.5 inches of rain, and it stayed dry as a bone inside!  GREAT JOB guys, but I'm glad it's yours and not mine!  They're boss (Wayne), although not photo'd here deserved to be because he was an absolute HOOT!  Probably about mid-late 60s, a REAL Carolina boy, been roofing all his life, missing a finger or two, and I'll let you fill in the rest with your imagination.

So to sum it up, we finished up most of the exterior trim, which includes soffits, brick pockets, stone pockets, and all "shake" style siding, and then painted all the exterior trim in "Tavern Taupe" (the darker color of the siding) and some shade of beige (which was a change from the first tested lighter shade that Judy called "Chickenshit Yellow").  Then we were able to put the shingles on.  We successfully passed the electrical, plumbing, and soon-to-be-passed mechanical inspections and are now ready for the Framing inspection. 

The last major piece of exterior now in progress is the brick, which I think is moving along quite well.  Ever wonder why you see houses with Brick Fronts and siding on all three other sides?  It's probably obvious, that the answer is $$$$.  Most builders think they could sell the house easier if its $10-$15 Grand cheaper, and that's about the difference in cost of brick vs. siding.  But ask any builder what THEIR house is built with? ... they'll most likely answer with ALL Brick, or some form of masonry.  Above, you can see a picture of the rear of the house mostly bricked up and I love it!  It's kinda hard to see the color in this photo because the mortar is still wet and the sun angle is rough, but it's coming out even better than I'd hoped.  And the brick Mason's from "Raleigh Area Masonry" a.k.a. RAM look like they're working slowly when you watch them, but they are very methodical, exact and when the long-day is done, they've laid literally numerous tons of brick. Below you can see a picture of them at work - and making a huge mess, which is what mason's do, but they'll clean it up.  The mud from the rain doesn't help, but it's all part of the process. 

Next, I have the insulation queued up.  I'm going with 95% spray-foam insulation throughout the house, which is becoming more and more popular.  It really seals up all the gaps tight and adds significant efficiency to the heating and cooling.  If you do the math, the extra expense has about a 3-to-4 year ROI or payback period on the investment, but after that it's all savings in your pocket on energy bills and a "greener" footprint.  The other 5% I decided to go with R-19 insulation under the floors in the crawl and R-30 under the bonus room (over the garage) to stay within budget and reduce the overall insulation cost by about 20%, with little impact on the efficiency.  I also have my friend the "slabman" lined up to pour the garage floor around the same time, then it's on to sheetrock!  Stay tuned.

Tuesday, June 21, 2011

...On The Outside...

Well, it's been a few weeks since I posted an update so I better get things caught up here.  Much has happened since the end of May; I went on vacation, I turned another year "wiser", and there have been wayyyy too many people working on the house.  Shortly after the last post at the beginning of June, framing was basically done and we had started on exterior finishing and began moving inside with trade work.  Although the house doesn't appear terribly different on the outside in the pics below than it did in the prior post, there has been close to another $40k worth of work done since then.  The first and most obvious change is the addition of Windows as seen in the pics below:

This is a major step toward achieving the next significant milestone in completion which is called "Dry-In".  That means all the openings are sealed and the inside of the house is basically protected from the elements.  We have a bit of a way to go yet to get there, but at the time of this posting, we're about 2-3 weeks away.  Aside from the garage door still missing, everything else is pretty much closed up and ready to be finished on the outside.


 If you look closely at some of the 2nd story dormers and gables on these pictures, you could also see that we were in the process of boxing, trimming, and siding the gables, and putting up soffit - which is the majority of exterior trim work.  This is now complete, although it was still in progress when these pictures were taken.  I'm thrilled to have found an excellent exterior trim crew that knew how to work the complex roof-line, and I REALLY like how the Nichi Sierra Shake Siding looks and the high quality of the Nichi brand board.  For whatever reason, everybody is using "Hardi-Plank" these days, but I think that's just because it's more a "fad".  I'm telling you, this "Nichi" product is MUCH better than the "Hardi-Plank" (same 50-year concrete-based siding concept) and about 30-40% less expensive in material cost than the "Hardi-Plank".  And it looks a TON more custom and high quality.  Love it!

With all the Boxing and siding done, along with the Brick pockets and stone pockets now formed below the soffit, the exterior trim will now be painted it's first coat of final color prior to installing the roofing material (shingles).  Exterior Brick and stone work will also be completed in roughly the same time frame as the roofing, all hopefully completed and "Dried in" by 4th of July - which believe it or not is EXACTLY on schedule from my day-1 schedule.  

Alot of other major work has also been completed on the interior - technically speaking, all the "Rough-in" of the plumbing, electrical, and Mechanical (HVAC) systems.  We passed the plumbing inspection about a week ago but still have a few punch list items remaining to pass the electrical.  That will be done in the next day or so.  However, I do have a bit of a horror story to tell on the Mechanical.  The very day that the HVAC rough-in work was all completed, the house got hit that night by bandits (or banditos) - thieves - who ripped out all the copper pipe that was just installed the day before.  This is a very common occurrence nowadays with the price of copper on the black market.  I have pretty much evidence as to who probably did the dirty work and will use the legality of my contracts as written to have the repair work done at little or no cost to me.  This is the kind of thing where it pays to know what you're doing with contracts, completion criteria, and explicit instruction and responsibility.  Someone did NOT follow instructions on this and I plan to hold them to the repairs.  Since the local Sherriff's office is involved and charges may be pending, that's all I'll say about that.  You can see some of the damage done though from this invasion in the pics below.

I knew it was just a matter of time til I invested in some pretty sophisticated surveillance and security system along with lighting for the site at night.  I just was hoping to get around to it before getting hit.   Nonetheless, charges may still be filed and perps prosecuted.  


So, onward and upward.  I also had the fireplace installed during this time which was a large effort.  I can't believe how the guy climbed up to the top of the chimney, and with NO HARNESS carried that huge cap up in one piece and secured it to the top of the chimney.  The fireplace will be a beautiful centerpiece feature of the family room, large enough to burn half a forest in the winter months for a toasty cozy feel.  I'm sooo glad I didn't get a pre-fab fake gas-logs thing, which IMHO you might as well just put up an LCD screen with a picture of a fire burning if you're going to use one of those.  Call me Pyro, but I need a REAL fire!   

Here's a few pics of the inside downstairs to end with.  By the next posting, I should have all the brick and stone done! 

 Til then - let me know if you happen to see a white/silver '99 Ford F350 Diesel Dually with a "ShowTime" trim package driving around your parts.  It's mine.  Someone stole that right out from under my friends nose last week who had borrowed it to tow his race car to a race in Wisconsin.   It was stolen from a Hampton Inn on the south Side of Indianapolis - truck, trailer, race-car, and all.  Major loss, mostly for my friend that races.  Prayers for him cause it meant everything to him.  Little chance of it ever being found though at this point.  Some people just SUCK.- REALLY REALLY hard!. 

Friday, May 27, 2011

Let there be ROOF!....and there was roof...

So it's been almost two weeks since my last post and I'm starting to pass myself off as somewhat of a seasoned General Contractor.  I know I have a long way to go, but it I'm feeling a little more sure-footed at this point and actually believe that I CAN do this now.  It seems kinda like snow skiing to me - I've only been skiing for one day, but I've been up and down the slope numerous times, I know how to get on and off the lift without flailing about wildly and making a scene, and at times I actually look like I've done it before.  Even though I still haven't had that full-speed wipeout on the Moguls that makes you see stars (been THERE too!), I've taken a few in the teeth and gotten back up and continued on my merry way.

The project is now at the point where we can look at the result so far and really begin to visualize what it will look like when complete.  The super-structure has been erected from the foundation thru the roof line, which all took just about 3 weeks and the work throughout the time period has been all about the Framing Contractor.  There's been a little bit of my consultant and I overseeing and authorizing decisions, but that's about it.  The picture above shows the view at this point from about a third of the way up the driveway.  

One of the most compelling things to me during this time was the amount of materials, material orders, shipments, trucks, and loading/unloading that's been going on.  About 97% of the materials were previously determined in a "Take Off" (Bill of Materials in my book) prepared by the Material Supplier from the final blueprints long before construction ever began.  I worked with the Supplier to have the "take-off" bundled into several predetermined "packs" that got delivered to the site along the way as the framer made progress, such as the "foundation and 1st Floor Pack", second floor and Attic Pack, and the Roof pack.  If this were someone else's house you might have had a "Wolfpack", but not in MY house!   There were a number of small parts that had to be special ordered and delivered along the way that we couldn't perfectly plan for in the Take-offs, and that's to be expected (estimation is NOT an exact science - that's why it's called an Estimate!).

Rear View - Master BR  and Back Porch area.

Front View from Street - Left Side facing
You can see from the series of pictures below what we have at this point of the Framers nearly being complete.  I'm happy to say, there were only a few minor hiccups throughout this phase where the framer had to tear out one area or another that wasn't done exactly right the first time.  Also, there were a few "alterations" to the original blueprints that also caused a little heartache.  Basically, the crew of Latino carpenters on the framing crew were very good at working according to plan, but there were some minor language-barrier challenges in trying to communicate a few minor "alterations" I wanted done along the way.

We were also blessed with a fairly long stretch of comfortable and DRY weather throughout the two-week span when the framing was going up and I use the word BLESSING very intently there.  I'd hate to try and frame-up during monsoon season.

Before the framers receive their 3rd and final "draw" (that means I write another CHECK) I will do a very detailed walkthrough (so much for the beach trip over Memorial Day weekend~!~) of the completed framing along with Ed (you remember Ed, right?) and come up with a "punch list" of carpentry items that either need completed, tweaking, or repaired before the framers are sent off to their next framing job nearby.  After that, we move on to Plumbing rough-ins, exterior finishing, roofing, windows/doors, HVAC rough-ins, and THEN Brick/Stone.   
Rear view, deck/garage side.